A film set with around 12 people, 4 of those are crew. ALEXA Plus on a dolly in front of a greenscreen.

Visual Effects FAQ

Common question regarding visual effects

  • There's a rule of thumb: "The cleaner the image the better the key".

    While many VFX-heavy productions have successfully used ProRes 4444 and ProRes 4444 XQ for their VFX work, only ARRIRAW provides the full resolution uncompressed sensor data and therefore the best choice for VFX work.

  • If ARRIRAW is not an option, ARRI recommends to only use the highest quality codecs for VFX work: ProRes 4444 and ProRes 4444 XQ.

  • ALEXA's super clean color separation is particularly important for green screen and other VFX work. Nevertheless sometimes it is important to work with more pixels than used later in the final product (for gaining more resolution for repositioning, resizing, rotating or stabilizing etc).
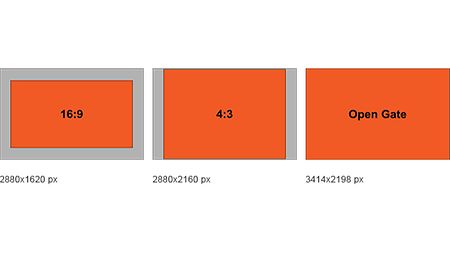
    Most ARRI cameras are capable of Open Gate sensor mode; in this mode the whole area of the sensor is captured.

    Please note that also the 4:3 sensor mode (where available) allows to position tracker marks etc in the areas which are not exposed for 1.85:1 or Cinemascope or to stabilize or reposition vertically without any loss of quality.

  • The ALEV3 and ALEV4 CMOS sensor has twice the number of green photosites than blue photosites; therefore the resolution of a green screen is higher compared to a blue screen. Also the green channel is less noisy than the blue channel when using tungsten light.

  • For a green screen shot neither white point setting has an effect on the green channel gain. Daylight and tungsten light deliver the same quality.

    For a blue screen shot the blue gain used with a 3200K tungsten light is substantially higher than the blue gain used with a 5600K daylight, therefore a blue screen captured under tungsten will be more noisy than a green screen. Hence daylight is preferred. 

  • The brightness of the screen should correspond to the foreground, which needs to be separated. A good target is, when the foreground is properly exposed for skin tones 1/3 of a stop above 18% grey, the screen should read about 1/3 to 2/3 of a stop over 18% grey, too. Please ensure that the background is evenly lit and not underexposed.

  • Our ARRI Reference Tool (ART) combines the functionality of our ARRIRAW Converter, ARRI Color Tool and ARRI Meta Extract in one tool. You can extract all metadata form ALEXA 35 into a *.json file.

  • Our standard texture “K445 Default” is designed to work well for all subject matters and settings, while making the most of the camera’s cinematic strengths. It is forgiving on skin, but also renders images with exceptional clarity and detail, which makes it also a perfect texture for green screen shots and VFX purposes.

  • The short answer is: 200-400 ASA for ALEXA/AMIRA cameras using the ALEV3 sensor and 400-800 ASA for ALEXA35 (ALEV4 sensor).

    Here's the long answer: The "base" rating for the ALEV3/ALEV4 is 800 ASA. When setting the camera to 800 ASA you get 7.4/9.3 stops of latitude above middle grey and 6.6/7.7 stops below. This gives you a very good range similar or even better to that of film.

    When shooting green or blue screens in a controlled studio environment, often the 7.4/9.3 stops above middle grey are not needed. In a situation like this it could be preferable to set the camera to a lower ASA rating. As long as the highlights don't get clipped a lower ASA rating will give you less noise in the image. When looking at a ALEXA or AMIRA image, often the noise/grain is not visible to the eye, but it is visible to a compositing keyer. Having less noise in the image means that the footage will be easier to key.

  • Linear Color Gamut
    Modern keyers best work when supplied with linearly-encoded images. Working in a linear color space will most often give better results than working with Log C encoded plates.

    Noise/Grain
    Most often it is useful to degrain/denoise ALEXA/AMIRA green and blue screen plates. Even when the eye cannot see any noise present in the image, there will still be noise present that will have an effect on the keying of these plates.

    Sharpening
    In case you are working with ARRIRAW files, you have the chance to set the sharpening value according to your wishes. This means that you can reduce the sharpening after the debayering and might find that you can pull a better key. You can use a second pass with increased sharpening for the fill or do a resharpen in your compositing system. Over-sharpened images create a bad key, less sharpened images a better key.

  • Our cameras offer three different encodings of the recorded image:

    • Linear encoding 
    • Logarithmic encoding 
    • Display-ready video encoding for Rec 709 monitors.

    While ARRIRAW is encoded as linear data, it can be converted to the other two encodings using the ARRI Reference Tool, ARRIRAW Converter (legacy) or 3rd party applications which support ARRIRAW. For ProRes clips, the encoding can be logarithmic or video (not available on ALEXA Mini LF or later).

    ARRI also offers Transformation-LUTs to convert from the different encodings back and forth. This can not be done without loss of data. For instance when recording a clip in Rec 709 encoding to ProRes files, these files can be converted Log C, but will have lost detail in blacks and whites.

    Linear Encoded Data
    Linear data is mostly used in VFX processing because it is the natural encoding for computer generated elements. The well-known ALEV3 senso for example has a dynamic range of 14+ stops which corresponds to a linear range of more than 15,000:1. In most cases floating point numbers are used to store this range (the OpenEXR image format, for example, is based on 16 bit floating point numbers).

    Linear from ARRIRAW files
    The most direct way to linear files is to record ARRIRAW and to process the data with the ARRI Reference Tool (ART)/ARRIRAW Converter (ARC). Third party software vendors also support ARRIRAW in their systems.

    Linear from Log C files
    Another way to obtain linear data is to undo the Log C curve of images recorded in QuickTime ProRes 4444, ProRes 4444XQ files.

    ARRI's online LUT Generator can create LUTs to convert LogC3 images to linear sensor data. When the LogC3 data is converted to linear sensor data, black (corresponding to zero exposure) will be represented by the value 256/65535. This sensor black level is the mean of all pixels. Because of read-out noise, single pixels may be above or below this value. The standard deviation of the read out noise is approximately 2.5 meaning that the offset of 256 is more than high enough to encode the full noise amplitude (usually one assumes a range of three times the standard deviation or ± 8 code values). Using the parameters for linear scene exposure will map the black value, as expected, to 0.0. With the noise, however, single pixels will come out as negative values. When those values cannot be preserved and one does not want to clip them, a small offset of 8/65535 should be added to the relative scene exposure factor. This is equivalent of adding flare to the image data. The amount of flare expressed relative to the scene white will vary with the exposure index. It ranges from 0.1% (for EI 200) to 0.8% (for EI 3200). The flare should be subtracted before the images are converted back to LogC3.

    Logarithmic Encoded Data 
    The Log C curve was first introduced with the ARRIFLEX D-20 camera. It's an encoding with a transfer characteristic similar to that of a scan from negative film. Because of the fundamental differences between digital cameras and negatives, however, the color characteristics remain different.

    Display-Ready Video Encoding for Rec 2020/709 Monitors 
    The Rec 2020 or Rec 709 output of the camera is either used for on-set preview or for when the program is edited for television without extensive color correction. Those images are displayed without any further transformation. While this simplifies the post production workflow it reduces the possibilities in color correction. The images have been tone-mapped and transformed into the target color space.

    The tone-map curve is applied to the Log C data. This transform is also available as a LUT for post-processing of Log C footage. While this provides a nice image on a video monitor, it also means that some information has been "squeezed out" of the transformed image. The matrix transform applied immediately following the tone-map curve results in an image transcoded into the target color space, but if the original image contained extremely saturated colors, this may also bring a loss of color. If a transformed color is outside the gamut of the display, it will be mapped or clipped to an in-gamut color.

  • Beginning with ALEXA Classic cameras SUP 3.0 until SUP 7.0 ARRI offered a film style matrix that could be applied to the Log C output. The same transform was also available as a 3D-LUT for post-processing of Log C footage.

    The film style matrix makes the color characteristics of the Log C image similar to negative film scanned on an ARRISCAN. The matrix is most usefully applied when the data is previewed or converted with a print film emulation (PFE) . This is the common workflow in Digital Intermediate where the PFE is applied as a 3D-LUT in the display path.
    The film-matrix can in some situations achieve a bigger color separation and therefore make the keying of some shots easier.

    Due to new developments in color grading and digital workflow our film style matrix has been discontinued.

  • The Log C curve is a logarithmic encoding for images that is used in all of ARRI's digital cameras. The encoding has a transfer characteristic similar to that of a scan from negative film. Because of the fundamental differences between digital cameras and negatives, however, the color characteristics remain different.

    Logarithmic encoding means that the relation between exposure measured in stops and the encoded signal is constant (straight) over a wide range. Each stop of exposure increases the encoded signal by the same amount. The slope of this part of the curve is called its gamma. At the bottom the curve has a toe. The toe accommodates the fact that the sensor cannot see as many distinctions between low light levels as it can at higher light levels. The resulting overall shape of the curve is similar to the exposure curves of film negatives.

    For more detailed information about Log C, please have a look at our Log C website, the Color FAQ, and our whitepaper "ALEXA Log C Curve – Usage in VFX".

  • Look files that are active in the camera while recording, get captured as metadata in the file header of ARRIRAW files, ProRes files (and DNxHD files).

    ALEXA Classic and ALEXA XT use the ARRI Look File 1 (ALF-1),  the following parameters are part of the ARRI Look File:

    • Color saturation value (called Saturation)
    • RGB offsets (called PrinterLight)
    • A mono free form curve applied to all RGB channels (called ToneMapLut)
    • The three primitives of the ASC Color Decision List (CDL), separate for each R, G, and B channel (called SOP Node – Slope Offset Power)

    ALEXA SXT, LF, Mini LF,  and 65 as well as ALEXA Mini and AMIRA use ARRI Look File 2 (ALF-2) which supports the following parameters:

    • genuine ASC Color Decision List
    • either 3D-LUT
    • or VLP (Video Look Parameters), containing tone mapping (Gamma, Black Gamma and Knee) and saturation by hue (over all saturation, red, yellow, green cyan, blue and magenta)

    ALEXA 35 uses the ARRI Look File 4 which supports parallel SDR and HDR output from the camera as well as:

    • genuine ASC Color Decision List
    • Log-to-Log 3D-LUT
    • custom DRT (coming with SUP)

    Find out more on the look files here and in our Color FAQ!

  • The ALEXA or AMIRA cameras store per-frame and per-shot metadata. This metadata is present in all recorded formats - onboard and in-camera formats ARRIRAW, MXF/ARRIRAW, ProRes, MXF/ProRes, and DNxHD. Per shot metadata is also written to an FinalCut Pro XML file, the ALE, and an AVID AAF when recording to ProRes or DNxHD respectively (depending on the camera).

    To extract that metadata use our ARRI Reference Tool, ARRIRAW Converter (legacy), or ARRI META Extract (legacy) for MacOS and Windows.

    Please also refer to our Metadata White Paper.

  • A part of the metadata we record is LDS (Lens Data System) information, such as Lens Focus, Lens Focal Length, Lens Serial Number and Lens Iris. This additional information makes documentation easier as the metadata is stored within the image files so it cannot get lost, which is a great difference to film times, where often the information collected on location got lost before reaching post production.

    LDS information can be used for easy camera set up, as the values of lens, iris, focal length and focus point, therefore also depth of field, are available. For recording the LDS data the cameras has to be equipped with an LDS lens mount and of course with LDS 1/2 capable lenses. Those are all ARRI Signature Primes, ARRI/Zeiss Master Primes, all ARRI/Zeiss LDS Ultra Primes, all ARRI/Fujinon Alura Lightweight Zooms. Other lenses can be used when the Lens Data Archive LDA is activated.

    In some VFX software packages the LDS information is displayed. In any case, you can use the ARRI Reference Tool to export metadata to a *.json file or ARRI META Extract (legacy) to extract the data into csv files.

    Please see our LDS FAQ for more detailed information on LDS 1 or 2.
     

  • This is an encoding where the digital values are proportional to the relative brightness in the scene. In more technical terms it’s said that the digital values are radiometrically linear. Scene Linear files are stored in a 16bit float container and are mostly used for VFX pulls.